Gardening with a Toddler

Editor’s Note: Today will be the first guest blog in STS history!  Both Meridith and I had guest bloggers on our individual blogs, and we love the additional insights added voices give to our topics of discussion.  Those who follow us on Instagram or Tumblr know that I have started a vegetable garden this year, and I have been having a blast.  I’m constantly amazed at how I, a person who presumably knows quite a bit about plants, keep learning new things through this process.  I was discussing this with my friend Christal recently, and we got to talking about how she had started a container garden with her 2-year-old son.  Adorable and educational?  I had to know more, so I asked her to write a post about the experience of gardening with her son, and what she thinks he has gotten out of the activity.  Here is what she shared!  
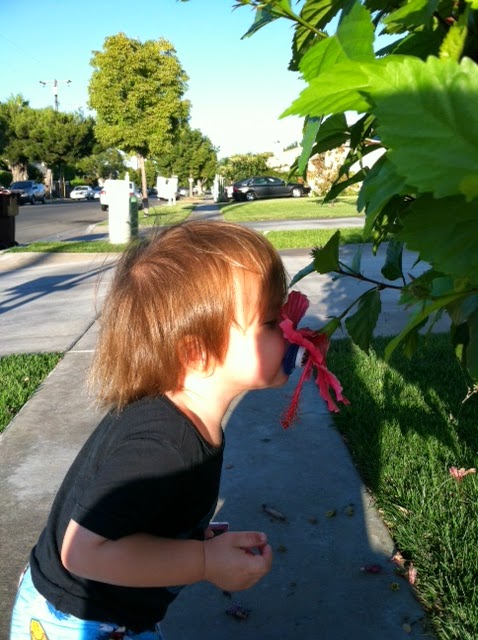
This kid is totally a STS kindred spirit!


They say everything starts with an idea. Gardening with my son started like this, but the funny thing was the idea wasn’t mine. It all started with a simple request from his father. It was a normal Saturday, we had just come from our son’s swim lesson and we were doing our weekly shopping trip to Target. Our first stop is always the dollar bin, usually for a small treat for the baby.  This time, his dad saw a cilantro growing-kit and asked if it would be OK to keep it at my place and grow cilantro with our son, like he did with his Mom. Of course! Our little bug, as we call him, loves being outdoors and playing in the dirt, examining plants and insects.  Why not try this?

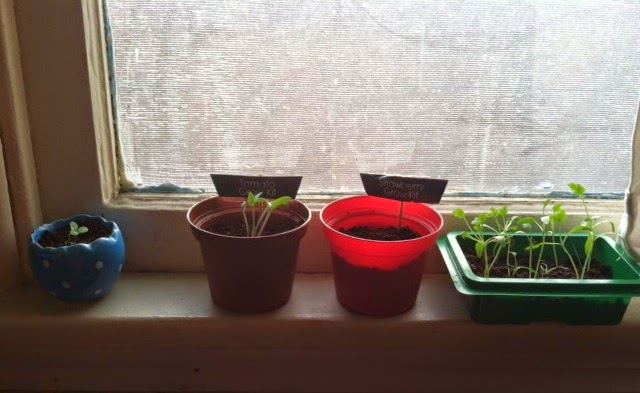
Early stages of the garden
Bug loved it so much our one, little cilantro plant quickly turned into a small window sill garden containing cilantro, a tomato, some strawberry plants, and a daisy. It became a daily ritual to water and check on all our little plants. Bug was the main caretaker, making sure he reminded Mom, Dad, or grandma (whomever was home) that he needed to water the plants. As they got bigger, we decided it was time to transplant them outside. In the past, before I had my son, this usually meant death for all my plants.  Out of sight out of mind.  Not this time!  My baby bug reminds me that we have to go water the plants (even if they don’t need it!). He has his own watering can and gardening gloves (I love The Dollar Tree for cheap gardening tools my two-year-old can use).


Transplanted outside
What started out as a simple project with his Dad has turned into so much more. He is constantly asking for new things to add to our garden. Decorations, plants, rocks, you name it.  When he is out with his Dad or grandma, he tells them Mommy needs more flowers for the house. Our newest additions have been an Easter lily his Dad got for us and a chili plant that my Mom gave him from her own garden. And it’s not only a love for plants that my son has gotten out of this, but also a sense of responsibility by taking care of something.  He sees the results of feeding and watering his little plants, discovers new “friends” that come and inhabit our garden, and enjoys the perks of spending time outside rather than being glued to the TV all day.


I love watching my son’s interest in nature grow. He now catches caterpillars, and we feed and keep them, so he can watch them transform into moths and butterflies. Recently he found his first grasshopper and spent the better part of the afternoon chasing it around the backyard with his Dad. These are memories that I cherish. They are ones that are filled with love and wonder, but they teach him as well. His love for all things outdoors has grown to us purchasing a season pass to our local zoo, as well as day trips to our local parks to see the squirrels and ducks. He constantly asks when we can go see the animals and fishes. Our family activities are centered around this growing interest our son has in plants and animals.  
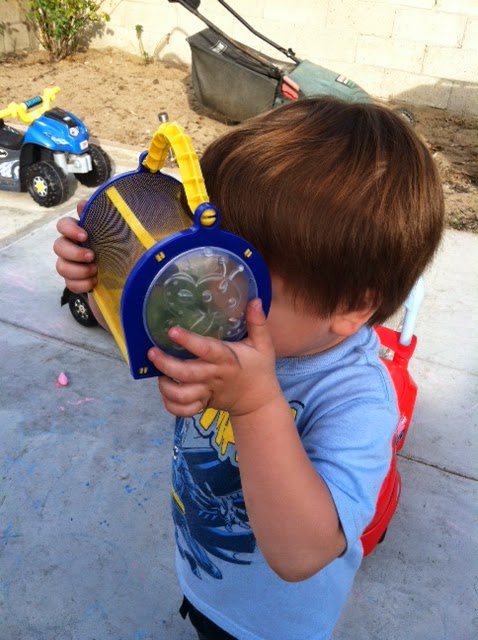
Keeping an eye on his caterpillar
Literally, can’t let them out of your sight!


He is the happiest kid I know (and though that sounds biased, it is also true!) and I know a lot of it comes from the quality time he spends with me and his Dad doing things that are engaging and memorable. All the things he learns from our little garden also come up in our other day to day activities. When we are grocery shopping he loves to help identify and pick out the fruit and vegetables. He asks questions like “What is this?” when he sees something he doesn’t know or “What does it taste like?” or “What color is it?”.  When I am preparing our meals, he brings his step stool in to stand next to me and ask me “What doing Mama?” and “You putting ‘matos in the pasta?”. He is becoming aware of how we can use what we grow or buy, and it gets his curiosity going. He asks to smell or taste various fruits and veggies that we buy or grow.


Every day I am amazed at my son’s curiosity and how much he has learned and remembers. It’s been almost a month since he chased that grasshopper, but he asked his Dad yesterday in the car if he remembered how bouncy that grasshopper they found was. If he sees a plant, animal or insect in one of his children’s shows, he has to come grab me and tell me about it and associates it with where else we use or see them. My son’s vocabulary has exploded since we incorporated all these family outing and projects. He can sit and tell you about things from tomatoes to narwhals. And it all started with a $1 cilantro grow-kit and a request to share a memory with my son.


Closing Thoughts from Rachel and Meridith:  We were super inspired by Christal’s insight into how simple outdoor activities really activate curiosity in children.  This really illustrates the point that you don’t need to take a child to a far off National Park (though that is rad!) to instill a love and respect for the natural world.  We were also really interested in the developmental changes Christal noticed after the family gardening projects began.  Responsibility, thoughtful questioning, increased vocabulary, all coming to her at the very low price of a little time and effort.  Rachel was also struck by the similarities between the things she has learned from gardening and what two-year-olds can learn.  She feels like she learns new horticulture terms every week now, and she is certainly asking new questions all the time (Why is this eggplant so sad?  Is this the right type of soil for chili plants?)!  These sorts of activities are the basis of scientific thinking!  


We are curious about the experiences of readers.  Have you gardened yourself, and what have you learned?  Have you ever gardened with a child?  Do you think gardening teaches skills that are relevant to future scientific education?


About Christal:  Christal works in the entertainment industry both as a performer and backstage technician, and she is also a single mom. Her work can be physically intense and injury prevention is essential to having a long term career. Her love for fitness started in high school when she took weight-lifting classes. There she learned about the anatomy of the body and what exercises were best to strengthen each area. Her passion for fitness continued in college where she minored in dance and tool as many nutrition courses as she could, including Healthy American Cooking. She is currently working two gigs, one as the shift manager at a southern California amusement park and another as a fitness coach through Team Beachbody.  Looking for a fitness coach?  Check out Christal’s websiteFacebook, or on Instagram.  Christal’s goal is to encourage others, especially her fellow moms, to be as physically fit and healthy as they can and feel good about themselves!  She is also passionate about the health and fitness of the next generation (specifically her son!).
Advertisement

Eco-Life Hacks: Making Homemade Stock

There are a few things that I truly love in this world:  science (obvi), my family/friends/cat, NAPS(!), and finding new life hacks that are both thrifty and eco-friendly.  Don’t get me wrong, I like things that are thrifty or eco-friendly, but when you get the two together…  These are usually little things or habit changes that I can pretty easily sneak into my normal routine.  They make me feel positive about my choices and they make it a little easier for me to buy obnoxious (read: more expensive) organic kale.  Win, win!  Right?


Allow me to play Devil’s advocate for a moment.  Our environmental problems are big, huge even.  The impacts of our personal choices are generally small, potentially imperceptible.  I get this.  People who tell you otherwise are not being straight with you.  So, why do I still make these small lifestyle changes in the face of all the facts?  There are a couple of reasons.  First, I think that over my lifetime my small choices can add up, and maybe that still won’t make a huge difference, but at least I can say I did my best.  Second, I truly and strongly feel a cultural shift toward these choices in the population at large can make a big difference in the years to come.  As we have seen so many times over the decades, a cultural revolution is the most effective way to make lasting change.


In an effort to shift our thinking toward an “environment first” mind-set, I’m going to share a series of these small eco-life hacks.  Please let me know if you guys like these tips and tricks!  By all means share them around, that’s the point.  Also, feel free to speak up if there is a certain part of your life that really drains your wallet or your stores of eco-karma.  I’ll do my best to focus on what you ladies and gents want to hear.


This first life hack is one of my favorites.  It is quick, super easy, and will save you some serious pocket money in the long run.  I speak, naturally, of making your own vegetable stock!  I know, I know, there are about a billion (you can quote me on that) blogs out there telling you how to make homemade stock.  But how many will give you a source citation to tell you why you should?  Now, there is at least one.  Essentially, by making your own vegetable stock, you are turning all the stems, cuttings, and bits of fruits and veggies you might otherwise throw out into a delicious and nutritious broth that can be used for a plethora of other kitchen tasks.  You are turning your food waste into something!  Good for you, that’s impressive and important.  I think this quotation from a study performed by Parfitt and colleagues in 2010 sums up why pretty well.  The U.S. statistics are equally embarrassing  but I chose the U.K. statistics because they were quantified in carbon emissions (Note: Mt stands for metric tons).    


“More recently, the Waste and Resources Action Programme (WRAP) has shown that household food waste has reached unprecedented levels in UK homes (WRAP 2008, 2009a,b), with 8.3 Mt of food and drink wasted each year (with a retail value of £12.2 billion, 2008 prices) and a carbon impact exceeding 20 Mt of CO2 equivalent emissions. The amount of food wasted per year in UK households is 25 per cent of that purchased (by weight).”


Yowza.  Are you sold?  Let’s take it to your wallet.  When I don’t have time to make my own stock (which is really never, it’s usually just because I’m stressed and won’t even make time to wash my slow cooker) I generally buy this brand of vegetarian vegetable bouillon for about 3 dollars.  Not bad really.  But making my own is literally free, because I would be purchasing all those vegetables that provide the scraps anyway!  And three dollars is enough to buy that bourge-y Buddah hand fruit that you’ve been wanting to try.  After a month of stock making, you could even go see a movie you would otherwise have had to pass on attending.  So there you go.


On to the stock!


Step One:  Collect your vegetable scraps.
There are several ways to go about this, depending on how much produce you consume and how often you want to make stock.  During the summer when I am a produce monster, I keep a bowl in my fridge and just toss all the scraps in there for safe keeping.  During the other seasons, I keep a tupperware or a baggie in the freezer and put my scraplets in that.


Things that work really well:  potato or carrot peels, stems of kale or other greens, skins of garlic and onion, tops of any root vegetables you don’t want to eat, apple cores, strawberry tops, lettuce stems, broccoli stalks, pulp from making juice, etc., etc.


Things that aren’t great:  banana peels…this is the only thing that has been a big regret for me.  Maybe this seems obvious to everyone else?  


Step Two:  Clean your scraps.
Once you have enough scraps collected (I use a full one gallon baggie), you want to wash them by soaking them in some sort of weak organic acid, like apple cider vinegar.  This will help to remove any dirt, pesticide, or wax that might still be hanging around on your food.  I think this step is particularly important because many of the scraps I use are the outer leaves of onions, garlic and carrot peels, and other parts that are particularly dirty or exposed.  I tend to just dump my frozen veggie in the water and let them thaw that way.  You can also let the bag thaw in the fridge overnight, but that just adds a step.


Step Three:  Rinse your veggies well and put them in the slow-cooker
First off, you can just as easily do this on the stovetop on low heat, but that requires that you be in the house.  I love using the slow cooker because I can put all my veggies in, set the heat to low, and go to work.  When I come home, my house smells like food!


You will want to add about 8 cups of water to the veggies in the pot.  At this point, you can feel free to get creative.  I usually add about a tablespoon of olive oil, some parsley, basil, crushed red pepper, rosemary, cumin, and a few bay leaves (bay leaves HIGHLY recommended!).  You also want to make sure an add at least half an onion and a few cloves of garlic if those two veggies don’t feature in your collected scraps.  They are always well represented in mine, so I tend not to add any extra.  


If you are using the slow-cooker, you can now set it and forget it for about 8 hours on low heat.  If you are cooking on the stove-top, I would just cook it on low heat for at least 2 hours.  Let it cook for longer if you can stand it.


Step Four:  Drain and store your stock.
Once you have cooked all the nutrient rich goodness out of your fruit and vegetable scraps, you want to strain the stock through a fine mesh sieve to get all the little bits of cooked veggies and spices out.  I tend to pour off the majority of the liquid, then spoon the solid veg into the sieve and give it a little smash to get more of the good stuff.


You can store your stock in several ways.  You can put it in jars and keep it in the fridge for immediate use.  I do this with about half of the batch.  The rest, you can freeze and save for later.  Initially, I was measuring one cup servings into plastic baggies and storing the extra stock that way, but it wasn’t very user friendly and I hate washing out plastic baggies (because I can’t just use them once!).  Now, I freeze it all in ice cube trays and transfer them to a bigger container once they have frozen through.  This allows me to easily customize the amount I can use from the freezer.  If I just want a little bit to saute some vegetables in, I’ll get out one cube.  If I need several cups, I will take out a bunch of cubes and melt them in the microwave or on the stove top.  If I over shoot and have taken out more than I need, I just stick the extra back in an ice cube tray.  Easy.    


As for your now mushy vegetable scraps, they have lived two lives and have served you well!  You can either trash them or try to find another use for them!  Any ideas?  I have a few that I am working on as we speak. Compost is the most obvious.  Maybe you’ll hear about them soon.


And there you have it!  A eco-life hack that could equally serve the broke college crowd or the young professional trying to make the world just a little bit better.  Hint:  You can easily be both those things at once.  Remember, if you want me to try and hack your life, or just a certain part of it, let me know in the comments!  I’ll do my best to oblige.  


Literature Cited:


Parfitt J, M. Barthel, and S. Macnaughton.  2010.  Food waste within food supply chains:  quantification and   potential for change to 2050.  Philosophical Transactions of the Royal Society 365: 3065-3081.

Reduce: DIY Drain De-Clogging

A tall grass prairie restoration site I visited while at ESA

Well, welcome back me.  It has been a second guys!  As you probably know if you follow me on Instagram or Twitter, I’ve been away at the Ecological Society of America conference, then I was a little ill, then I got a fellowship (!!!!), then I started packing for our move at the end of the month, and then my boyfriend started nagging me about unclogging the sink.

See, as anyone who has ever rented housing probably doesn’t need to be told, our bathroom sink clogs up a lot.  We are really careful not to flush a bunch of hair or what have you down it, but inevitably, about every other month, it needs to be attended too.  Usually, the fella’ takes care of this ASAP, but after the last Drano purchase, I told him next time the sink needed fixing I wanted to attend to it.  Earlier this year, I was perusing Pinterest and came across something which I quickly stuck on my Green Lifestyle pinning board:  an all natural drain de-clogger.  Now, Drano itself doesn’t have a ton of explicitly cataloged negative impacts to the environment (read: I couldn’t really find any studies about it).  However, the two major active ingredients, bleach (NaOCl) and sodium hydroxide (NaOH), are known to have several human health impacts (see some EPA reports here and here).  Plus, the stuff comes in a plastic bottle, which I don’t feel comfortable reusing for anything because…you know…it had Drano in it.  The final nail in the coffin, for me at least, is that the stuff costs between 5-10 dollars a bottle.  Generally, if it will hurt me if I accidentally eat it and if it costs a bit of money, I’m over it.

Image courtesy of howtocleanstuff.net

Enter the Pinterest solution.  According to the original pin, I could mix half a cup of baking soda and one cup of vinegar together in the sink and then pour a kettle of boiling water down after it, and voila no more clog!  I would link to the website that generated the pin, but it turns out the link just lead me to a picture of a drain…so you’ll just have to accept that I didn’t come up with this, but I don’t know who to credit. 

 Now, both vinegar and baking soda get a seal of approval from the EPA (see the fact sheets here and here).  The only caution is that high concentrations of acetic acid (found in vinegar) can be harmful, but if you ever had college chemistry, you know that vinegar is only 5-8% acetic acid.  Additionally, baking soda comes in a cardboard container, which is great.  Unfortunately, the vinegar I bought came in a plastic bottle.  You certainly can buy vinegar in glass, but it costs more.  I justified by buying in bulk, knowing that I would use the stuff for lots of other things round the house, and feeling like I could actually reuse this plastic container after the vinegar was gone…because vinegar doesn’t sketch me out.  Last, a huge thing of vinegar plus a box of baking soda only cost me about 5 dollars, and I have tons of vinegar and about half a box of soda left over to cook and clean with in the future.  
But that still leaves the ultimate question, did it work?  The answer:  YES!  I had to perform the treatment twice because I let the drain get really bad.  That’s why there are no pictures of me fixing the sink in this post.  My sink was gross.  However, it was super easy, and we’re all fixed up now!  I’m really excited this worked out, and will be using this solution from now on instead of alternative products.  Bonus points, these are the ingredients you used to make your elementary school science class volcano!  There was no eruption at these proportions,  but I did feel like I was playing not cleaning.  Win, win.    

Last Word:  I love DIY solutions that require less chemicals and save me money.  It’s like all my favorite things in one neat little package.  As time goes on I will be testing out a lot more of these all natural internet claims!  I’m excited to experiment and see what happens.  

What do you think?  Have you ever tried a “green” solution off the internet?  Were you rewarded or disappointed?  Do you have any suggestions of things you’d like me to research or try out?  Let me know in the comments section!

UPDATE:  I did this again today (8/30) with my garbage disposal and after two applications and a little plunger action, we were good to go!