Fiscal Responsibility feat. Sweet Graphs

Back in April, I took a big step towards being a Real Adult and started my own budget spreadsheet. After just the first month, I was completely shocked at how much I was actually spending (read: THAT much on dining out?!) Now that I’m heading back into the tight grip of grad schooldom, I know that I need to prepare myself for the grad school lifestyle. Which, of course, means living within my means. My first step in this preparation process was to create a budget spreadsheet for myself. I’m a big believer in ‘knowledge is power,’ and had to embrace that mantra to keep my head up while working on this project.

I started in Excel with two of the provided templates: College Cash Flow and Monthly Home Budget. Both templates provides you with a file already outfitted with calculations to auto-fill the green boxes based on data in the yellow boxes. In the College Cash Flow file, you input your starting money on hand and monthly expenses by convenient categories likely to be used by college students (e.g. books, tuition, etc). Your total income, expenditures, cash flow, and ending balance are automatically calculated for each month. The Monthly Home Budget sheet performs a similar task, but on a shorter time scale. You also have an opportunity to compare your actual income/expenses to budgeted ones. Together they are both useful, but I found that with a little extra work I could create a more interconnected, useful budgeting tool, complete with visuals.

I wanted to know more about my individual purchases in addition to total monthly charges, so I added a section to the Monthly Home Budget sheet at the bottom where I could input each individual purchase with Date, Cost, Type, and Notes. I found that having to record each transaction separately also helped me stay aware of my spending as the month progressed. I have Office 2008 for Mac on my computer, so everything I mention subsequently will be specific to that version of Excel.The major amendments to the spreadsheet templates are as follows:

  1. I wanted to have a drop down menu of categories for when I input individual purchases, to eliminate the possibility of typos. This was more an issue of formatting than coding. 
  2. Screenshot 2014-05-21 21.28.05.png
    May was a pretty cool month. I was much more conscious of what I spent even after a month of keeping track and budgeting.
    1. Highlight the boxes where you want the drop down list.
    2. Data -> Validation
    3. Allow: Select “List”
    4. Source: highlight the categories from the Variable Expense section
    5. Okie doke. You can also copy/paste this format into other cells.
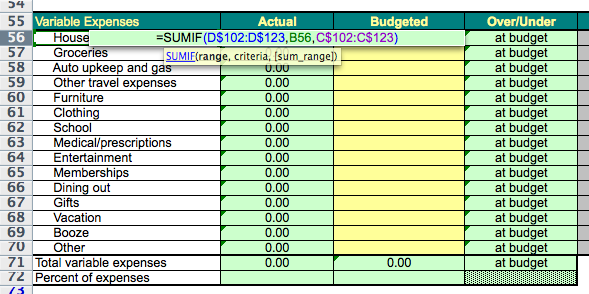
  3. Next, I wanted the “Actual” cost cells in my Variable Expense column to automatically update from my individual transaction list. But that meant that each categorical cell would only update with it’s specific type of expense.
    Let me reassure you, this was not too difficult at all! And I felt like such a badass every time I figured out a tiny little thing. 
    1. In the Actual column next to the first category (household) type “=SUMIF(“
    2. Highlight “Type” column then insert a comma
    3. Click the category name then another comma
    4. Highlight the expenses column and end parentheses
    5. Repeat steps for each category/type (e.g. household, groceries, gas, etc.)
    6. Now that the Variable Expense Actual cost cells auto update, I changed the color to light green.  
  4. I wanted my monthly expenses to automatically be filled in on the College Cash Flow sheet. In hindsight, I could’ve made this a little easier on myself by rearranging the “Expenditures” list to match the ordering on the Monthly Home Budget sheet. 
    Oh man, Meridith, there’s not much going on here. Are you going to release a template for everyone. Maybe. Just maybe. 
    1. I started in April, so I would’ve gone to that month’s column in the CCF sheet. Clicked on the cell that matches up with the Household Costs row.
    2. Entered =’April Budget’!$C$55, where April Budget is the name of my Monthly Spreadsheet for April and C55 is the cell where my Household Variable Expenses are totaled. 
    3. Some expenses on the yearly sheet, like utilities, may be broken down into more specific categories on your monthly sheets. You can use =SUM() to compile those cells. 
  5. I love visualizations. I wanted to see these data represented so I could see, at a glance, where my spending was occurring. Where are the sweet graphs?! Missing?!  No sweat, I just had to make my own. I had a pie chart of my variable expenses on my monthly spreadsheets. I kept the fixed expenses off because huge costs like rent would just overwhelm the graph. 
    Can you tell I like food?
    1. Highlight “Variable Expenses” and “Actual” columns
    2. Insert > Chart > Pie > whatever the most basic one is
    3. I also did a similar pie chart for the yearly sheet using the “Expenditures” and “Yearly Totals” columns.
Celebrating my time in Newcastle the proper
 way – dancing my heart out. 

Ahhhh, fiscal responsibility and organization. You really can’t beat it. Don’t be afraid to try your own tweaks to the budget sheets. I’d love to hear your insights. The important thing is that you’re staying aware. I’ve known many a young lad and lassie who just wanted to ignore their financial obligations and responsibilities. Your twenties are not for mistakes and frivolity! Ok…they are a little bit. I’ve mistaked and frivoled. But I’ve also been conscientious of long term savings, and because of that (in addition to supportive parents and lots of living at home) I’ve been able to do some really frickin’ cool shit! After completing my Master’s degree I moved home, worked for a few months, bought a plane ticket, packed a bag, and left for a completely wild 90-day, self-funded, solo adventure through Europe. I had zero responsibilities. Minimal worries about my funds. And all of the funs. All of them! Sure, it meant watching my money closely during my time in New Mexico. I rarely went out and spent money on beers and food. I lived with roommates with ridiculously cheap rents. I nearly never went shopping for clothes. But it was all completely worth while when I landed in Dublin and immediately had adventure after adventure!

I’ve been looking into what other things I can be doing to be extra responsible with my finances. I’m not anywhere near 40, but this cool article has really inspired me to think about awesome next level goals I can set for myself. I’ll be studying for my PhD for the next five years, and while that comes with a stable stipend, it’s not the same as having a job with a 401K and retirement plans and all of these other benefits that I’m mostly clueless about. If you are looking into other ways to keep yourself in check with your cheques, then you might want to consider the many financial apps available. SciFri has a lovely podcast on them. You know how much we love podcasts. I have friends that also swear by the cash envelope system. Each month you take out the budgeted amount of cash (lump sum or broken into categories) and that’s all you have for the month. You run out…tough cookies.

If you’d like more money saving tips throughout the week keep an eye on our STS Tumblr for extra posts. We’ll share different articles and our own personal insights on how we live on the cheap! We also want to hear about what’s your method? Any super awesome money life hacks that we could benefit from? By all means, let us know! 

Cover Letters of Interest

Once you’ve gone through the process of finding potential grad school advisers, the next step is to contact them. It can be quite scary. That fear that you’ll craft a seemingly marvelous letter, attach your well-written CV, send it off, and then…hear back nothing. Or worse, you’ll hear back, but they aren’t interested in your obvious brilliance. Try not to get in your own head too much. Think of it more as the start of an epic journey towards the next step in your blossoming academic career. The professors that show the most interest in you are going to be the ones that are the best fit for your unique interests and skills. Writing about yourself is hard, but now is the time to brag on yourself a bit. Say it with me, “I am a badass science baller and all the profs want me.” Keep in mind that this letter does not need to be perfect. I just looked back at the cover letter I sent to my MS advisor (keep anything you write about yourself!) and it’s nearly 2 full pages long with way too much information. Thankfully, she wasn’t bored, and I had a wonderful, productive Master’s experience.

Say it again!

There’s a fine line between a letter of inquiry and a cover letter. Basically, if there is a posted opening with the advisor, then it is a cover letter. Otherwise, it’s a letter of inquiry, simple as that. The aim of such a letter, when writing to potential advisers, is to express your informed interest in them and their research, while also presenting a focused snapshot of yourself. Informed interest is important. Make sure you familiarize yourself with their work. Read their papers.  Brainstorm ideas for how your work could compliment theirs.  I’m not going to lie, this can be tough. I find it helps to remind yourself that you are not contractually bound to follow through with the ideas you come up with and present during your application process (Editors Note: This was my mantra to Meridith during her PhD application!  Glad to see it sunk it.). You just want to show that you are an intelligent being with a real interest in a similar field of research and that you can come up with relevant ideas.

To begin, you’ll want to state your interest in their lab and ongoing project(s). A common pitfall is to contact a professor about an area of research in which s/he is no longer active. Check the dates on those publications!  Additionally, some professors will be looking for more than one student to work on a several different projects. Clarify early why you are writing to them. They get numerous emails daily and the easier it is for them to read your email, the easier it will be for them to respond. Next, the second paragraph should be a self introduction. What are your recent experiences, and how would the skills you have benefit you if you were to join this person’s research group? The third paragraph should be dedicated to expressing your interests, goals, and ideas for research. The final paragraph is a little more general.  You can think of it as a summary:

I think my interests, skills, and future plans could potentially fit in well with your research program.  If you have room for a PhD student in the (interest term and year here), please let me know if you would be open to discussing my interests or experiences further. I have listed some of my major accomplishments below, but I have also attached my full CV if you would like further information about my past experiences and skills. I know you are very busy, so I appreciate any time you can give me.  Thank you very much.

I like to include a little bulleted list of notable accomplishments to whet their appetite. I wouldn’t advise giving them more than your “top 5.”  The goal here is to entice them to open your attached full CV.  Good achievements to mention are:

  • GPA
  • Grants or scholarships awarded (and how much $$ you were given)
  • Examples of academic excellence (exceptional GRE scores, special skills, unique courses taken with grade)
  • Evidence of research experience (REUs, internships, volunteer positions in research groups, etc.)
  • Publications (with links) or presentations/posters 

The internet already has loads of posts on this topic and plenty of sample letters to reference. Don’t rely on just this post!

Contemplative Mammoth’s Post
Dynamic Ecology’s Post
The Professor is In’s Post
Simple Sample Letter
In Depth Cover Letter Essentials

Please let us know if you have any other great cover letter references! We’d love to let this list grow and provide a wide array of recommendations for the future graduate students among us!

What’s in Her (Field) Bag

Summer is a funny time for an ecologist.  As a student, my classes have all wrapped up (I’m actually all done with class now, forever!!).  My social media is full of people’s summertime adventures.  My partner, who teaches communications courses at community college, is in full on vay-cay mode.  Me?  This is my busy season.  I have been up to my eyeballs in marsh mud for most of the month, and for the month before that I was prepping.  
China Camp State Park.  Maybe my favorite site.

Ah, the field season.  The first day of the each sampling period, I’m always a huge stress ball.  By the time I visit my last site, I feel like Queen of the Marsh.  One thing I always do to minimize my first day jitters is prepare a packing list for each project I’m working on.  This helps minimize those “Oh crap, I left that sitting on the lab bench” moments.  This packing list is mostly full of project specific items (thermometer, pH probe, redox meter, etc.).  In addition, I have a mental checklist of things I never like to don my waders without.  These items reside in my trusty field bag, and today I’m giving you the grand tour!

I know we have an eclectic readership, from PhDs, fellow students, teachers, and amazing high school science enthusiasts.  Though you might not all be headed out to do field work anytime soon, I hope a look at my “must have” items gives you a taste for what a day in the life of a field scientist can be like.  Think of this as the field biologist’s version of those posts by lifestyle/mom bloggers about what they keep in their purses/diaper bags.*


Trusty field bag!
For Real Essential Things
Most of the things in my bag are things I find randomly useful, or things that keep me safe and comfortable while working.  There are a few absolutely, 100%, totally essential things in my bag.  All my official permits live in their own protective plastic baggie.  I’m not trying to become a marsh bandit, so I want to have proof of my officialness.  Next, for those just starting their ecology journey, field notebooks are your friends!  I have two, both made with write-in-the-rain paper (necessary).  You can even buy special write-in-the-rain pens that will write on the paper under water.  My former lab mate and I may or may not have spent a good 20 minutes doing this in the sink when I was gifted one of these pens.  Pencils work too, and you should have several!  Also, permanent markers.  Always, always, permanent markers.
Stuff to Keep Your Stuff Clean
In case you can’t tell by the state of my bag, I work in the mud.  Mud means water.  In addition, my muddy water is salty.  So, even though I don’t bring anything out into the marsh that I’m not willing to risk destroying, I like to take a few precautions.  A tarp allows me to place bags and equipment on the mud, not the vegetation, but keep them clean and dry.  I purchased that blue dry bag when Meridith and I were about to hike the Narrows at Zion National Park.  I usually keep my lunch in there, but it’s just a good thing to have on hand.  Occasionally, one of my undergrad crew will realize they tottered out on the mud with something electronic, and I’ll toss it in there for safe keeping.  On top, you’ll see my Lifeproof iPhone case.  I always bring my phone into the field with me for safety reasons.  Also, marsh selfie reasons.  I’ve been really happy with this case overall, though it does make the keypad a bit less sensitive and it can make charging difficult, depending on the charger.  Thus, I have a non-field case for daily use.  Apparently you can literally dip this case in the water and take phone pictures, but I just can’t live that life.  I think my camera itself also fits in this category.  I sport an Olympus digital camera.  This sucker is shockproof, waterproof, freezeproof, and dustproof.  Basically, Rachel-proof.  I bought an older version of the camera I have now when I broke my previous digital cammy by dropping it from a height into water.  I’d say each one I’ve purchased has lasted about 3 years.  Not trying to give a product review here, but that is three years of snorkeling, being dropped on the floor of canoes, hiking up mountains, and generally marinating in mud.  They aren’t the best cameras for capturing vibrant colors, but I’m still a huge fan.      
  

Safety and Well being Essentials
 

The next group of things living in my bag are there to keep my happy and safe during the whole day.  My Platypus hydration bladder was also purchased when Mer and I were on our road trip.  This system  makes it easier for me to carry enough water to actually stay hydrated all day.  A water bottle or two just doesn’t cut it for 7 hours of physical labor.  Sunscreen is also essential for a long day.  I usually have the lotion kind to apply first thing in the morning and the spray kind for reapplication when my hands are covered in mud.  It’s also a good idea to have a chapstick with sunscreen in it, as the skin on your mouth can easily get burned too! Bug spray, enough said.  Mosquitoes love me, but it’s not mutual.  The first aid kit I’ve put together is by no means extensive, but I think it has most of the essentials.  I love the spray antibiotic ointment (thanks Meridith’s mom!) especially.  It’s good for after you have a chance to wash off, usually in a gas station bathroom, and you notice all the wee cuts that were covered in dirt.  I also always have a headlamp with me, just in case.  The last, and maybe most awesome, thing isn’t pictured…because I thought that might be weird.  This is a lady specific item, called the p style.  Basically, it allows women to pee standing and without having to totally drop trow.  This is 100% amazing for me as I work in a system with zero trees, and my sites are often ringed by running trails.  Maybe you think it’s weird, but don’t knock it till you’ve tried it.  My sister, who hiked ~300 miles of the AT last summer, was gifted one by yours truly and told me it was amazing to be able to pee without having to take off her heavy pack each time.  You’ll thank me for this one day.


Things I Need Surprisingly Often
This is the category of odds and ends things that I often need, but I’m never really sure what I’ll need them for from one day to the next.  These are maybe a bit specific to my own work, so I’d love to hear from other scientists about the odds and ends that are always randomly helpful to them!  I carry a trowel for digging up things.  I also have a hammer, usually for banging PVC into the ground.  Spray paint is great for marking the ends of the PVC that show where your study areas (transects, blocks, etc.) begin and end.  White PVC seems so visible when you first put it in the ground, but when you come back months later and the grass has grown, and your PVC is dingy, a little red spray paint can really help you find things.  Rubber bands (or zip ties depending on what you have), extra ziplock baggies, tape (electrical pictured, but duct tape is awesome!), and a ruler are great things to have on hand.  I literally cannot even list all the uses of these items.  Last, I think every person who works in the field should own a good knife, preferably a multitool.  Seriously, so many uses!


On My Person (but sometimes in my bag)
Lasty, there are a few things that are sometimes in my bag, but usually just on my person.  I almost always wear a hat or a bandana.  I also generally have on polarized sunglasses.  Your retina can get sunburned too!  Additionally, polarized lenses help you see through glare.  Layers are essential as well.  Even in the summer I have a tank top, a light shirt, a long sleeved shirt (or sweater in the cooler months), and a waterproof layer.  Last, always always wear a watch.  You need to know when the tide will be coming back in, or how long till sundown, or how much longer to leave that instrument in place to get a reliable measurement.  A waterproof watch with seconds displayed will only cost about 20 bucks, and it’s totally worth it.
I’m not kneeling, I just have one leg sunk in mud up to my knee.
Shew, so you have gotten this far and you are now wondering “Holy crap, Rachel why do you carry around so much stuff?!”  True story, one time I got lost in the woods.  My little sister, my college roommate, and I went on a short hike that turned into a 15 mile hike.  It made an impression on me.  While lots of the stuff detailed above is to help me with my work, there are a few things that I now refuse to go without if I plan to be outdoors for more than an hour.  So, for those who maybe aren’t as obsessively over prepared as me, here is the Reader’s Digest Version of what I think must go in your field bag/day hiking pack.


Don’t Hit the Trail Without    
– Enough water to hike twice as far as you plan to go
– Several energy dense snacks
– A headlamp
– A watch
– A map
– A first aid kit containing at least a compression wrap for sprains and an emergency blanket
– Your phone.  Maybe you won’t have service, but maybe you will.


And there you go.  A full tour of the inside of my field bag!  I’d love to know what you keep in yours.  Any hikers or backpackers out there?  What do you refuse to venture out without?
* True confessions.  I adore both lifestyle and mommy blogs.  Sorry, not sorry.